Adaco Requisitions Guide
Introduction
This resource enables you to retrieve information about current and historic requisition activity between Adaco outlets. Requisition items are typically either products or menu items (recipes). The response includes requisitions that were both issued and received by the specified property.
Quick Facts
| Integration type | HTTP REST with JSON |
| Authentication | Basic Authentication |
| Availability | Fourth Inventory for Hotels customers |
| Testing | Test environment is available on request |
| More information | See the Adaco Web API Reference |
Updates
You can find any updates on the Release Notes page for the Adaco Web API.
Get Access
Before integrating, you'll need to set up a new user account in Fourth with access rights to the API and resource.
Requests to the Requisitions resource are not restricted by property. This means you can retrieve requisitions data for properties in which the user account is not present.
Step 1: create a user group
Create a user group for accessing the API within one of your Fourth properties — we recommend the central purchasing property where there is one.
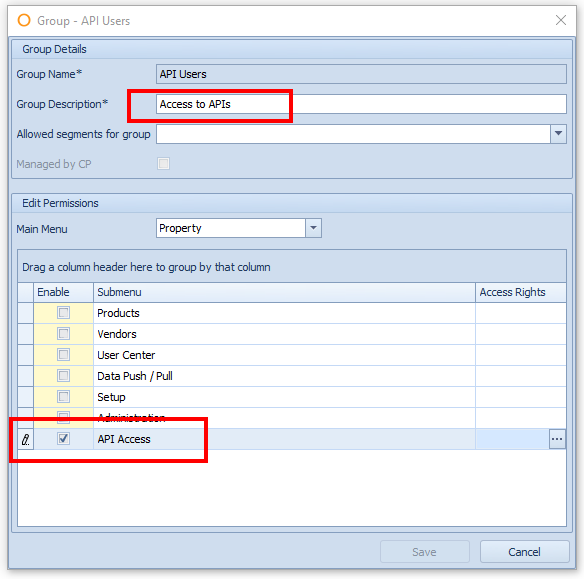
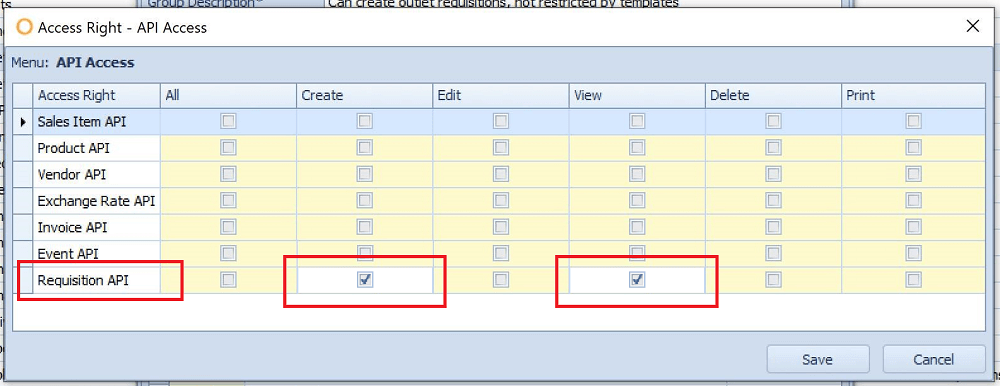
For security, we also recommend that you limit the user group to access to just the “Requisitions API”. The setting for this is within the user group's Property > API Access sub-section. Select the View option to provide access to GET requests, and Create for POST requests.
Step 2: create a user account
In the same property, create a user account. Assign it to the API user group.
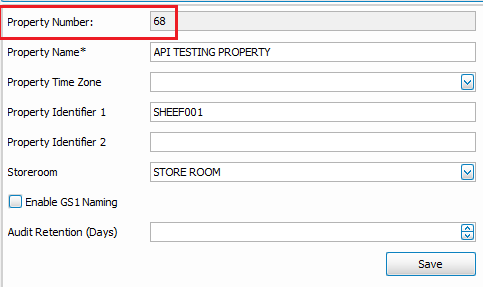
Getting the property number
You’ll need the property number of your Adaco properties before you can make an API request. You can find the property numbers in the Fourth UI.
Units of Measure
The response to requests includes an IssueUnit field. This returns predefined values you can find in the Units of Measure table.
Resources path
Details for integrating with the resource are available in the Adaco Web API reference.
The resource supports GET and POST requests only. The path for Requisitions requests is:
<ROOT>/{customerName}Service/WebApi/Requisitions/{propertyNumber}
This is made of:
- The domain name of the Fourth cloud, referenced as <ROOT> above.
- A customer-specific customerName — this is the same name in the URL that is used when the customer logs into Fourth Inventory for Hotels. You must also add "Service" to the name; e.g. "acmeService".
Request header
For all requests, you must provide your authentication details using Basic authentication in the header. Example header:
GET /{customerName}Service/WebApi/Requisitions/{propertyNumber}  HTTP/1.1
Host: instance.example.com
Authorization: Basic VXNlcm5hbWU6cGFzc3dvcmQ=
Content-Type: application/json
| Field | Description |
|---|---|
| Authorization | Your Requisitions API username and password, separated by a colon, and then base64 encoded. Your ID and password are case-sensitive. |
| Content-Type | The data format you are using for POST request. Options are: application/json, text/json. |
Filtering GET requests
There are four optional parameters which can be included in the URL query string: pageSize and page let you determine how many requisitions you want returned in the response, while status and modifiedsince let you filter the responses.
For example, this request gets pending requisitions from and to property 12345. The request specifies the 3rd page of results, where each page holds 10 records:
GET <ROOT>/ACMEService/WebApi/Requisitions/12345?pageSize=10&page=3&status=pending
See the Adaco Web API reference for a full description.
Making POST requests
Getting product details
To make POST Requisition requests, you will need to know the products or menu items available. Depending on your needs, this will require an integration to either the:
- Catalog resource that is part of the Adaco Web API
- Adaco Sales Item API
If you are unsure which to use, your Fourth Implementation Consultant can help you determine which integration you require.
Tracking requests
To ensure that you can easily track your requests, your POST Requisition requests can include your own identifier. The field name is RequisitionReference:
[
  {
    "RequisitionReference": "A1B2C3",
    "FromOutlet": 123,
    "ToOutlet": 321,
    "NeedByDate": "2022-07-05",
    "RequisitionItems": [
      {
        "ItemNumber": 456,
        "ProductDetailNumber": 567,
        "ItemType": "P",
        "RequestedQuantity": 6
      }
    ]
  }
]
We will return both your identifier as RequisitionReference, and our own unique identifier as RequisitionNumber in the response to the request. The response will include details of any issues with adding requisition items (see below).
Assigning Accounts to Requisition Lines
The request body enables you to optionally specify the ToAccountNumber and FromAccountNumber.
When these are included:
If there is an account number in the request body, then that will be checked against the available accounts that can be used by the outlet (Outlet Accounts where this is enabled). If it is an allowable account it will be used. If it is not an allowable account, or does not exist, Adaco will create the requisition line without an account. An Adaco user will need to manually assign an account to the line before the requisition can be posted.
When these are not included:
If there is no account specified in the payload then the outlet guide will be checked to see if there is an account assigned to the item. If there is an account assigned in the outlet guide then that account is used. If there is no account for the outlet then Adaco checks if the product account is valid for the outlet and if so, uses that. If there is no account specified for the item in the outlet guide, and the product account is not valid for the outlet, then the requisition line will be created without an account. An Adaco user will need to manually assign an account to the line before the requisition can be posted.
Example POST request
The following example shows both mandatory and optional fields. Visit the Adaco Web API reference for a full description of each field.
[
    {
        "RequisitionReference": "REQ001",
        "FromProperty": 12,
        "ToProperty": 12,
        "FromOutlet": 210,
        "ToOutlet": 122,
        "Description": "Black Cap pre-game orders",
        "Comments": "VIP Event",
        "NeedByDate": "2022-07-13",
        "SortOrder": "Location",
        "RequisitionItems": [
            {
               "ItemNumber": 66836,
               "ProductDetailNumber": 1,
               "Unit": "I",
               "ItemType": "P",
               "RequestedQuantity": 1.5,
               "FromAccountNumber": 43400,
               "ToAccountNumber": 33800
            },
            {
                "ItemNumber": 4500101,
                "ProductDetailNumber": 0,
                "ItemType": "R",
                "RequestedQuantity": 15,
                "FromAccountNumber": 43400,
                "ToAccountNumber": 33800
             },
             {
                "ItemNumber": 637796,
                "ProductDetailNumber": 1,
                "ItemType": "Q",
                "RequestedQuantity": 2500,
                "FromAccountNumber": 49999,
                "ToAccountNumber": 39800
             }
        ]
    }
]
Response to GET requests
Successful requests
Successfully submitted requests receive an HTTP 200 OK response.
You can find a full description and example in the Adaco Web API Reference.
Unsuccessful requests
Unsuccessful requests receive an HTTP 400-599 response, with an error message in the response body.
Response to POST requests
Successful requests
Successfully submitted requests receive an HTTP 200 OK response.
If there were no issues with the request, then the response will be similar to the following example:
[
    {
        "RequisitionNumber": 345,
        "RequisitionReference": "REQ001",
        "Status": "Created",
        "Errors": null,
        "UnMatchedItems": null,
        "UnMatchedAccounts": null

    },
]
Status: Not Created results
However, if some of the items could not be requisitioned, then the response will include details to help you resolve the issue.
If the Status value is Not Created, then the Errors field will include a description of what stopped the requisition from being created.
| Error message | Resolution |
|---|---|
| From or To Property does not exist | Check the value for ToProperty and FromProperty within the request body. These must already exist in Adaco. |
| From or To Outlet Number does not exist in specified property | Check the values of FromOutlet and ToOutlet within the request body. These must already exist in Adaco. |
| Requisition Reference is not unique | The value of RequisitionReference has been used previously. This reference must always be unique. |
Example response where the Status value is "Not Created"
[
    {
        "RequisitionNumber": null,
        "RequisitionReference": "REQ001",
        "Status": "Not Created",
        "Errors": [
            "From Property does not exist",
            "Requisition Reference is not unique"
        ],
        "UnMatchedItems": null,
        "UnMatchedAccounts": null
    }
]
Unmatched Items
If the Status value is Created with Unmatched Items, then one or more items in the request were excluded from the requisition order. The field UnMatchedItems will contain the item number (plus product detail number for products) and an error message describing what the issue is. For example:
"456: Unrecognised Item Number"
Where 456 is the item number.
Only items listed as UnMatchedItems are excluded in the requisition request. All other items — including those potentially listed in the UnMatchedAccounts field — are successfully included in the requisition order.
| UnMatchedItems Message | Resolution |
|---|---|
| Unrecognised Item Type | Check the value of ItemType in your request. This can only be P, p, R or r. |
| Unrecognised Item Number | Check the value of ItemNumber in your request. Check that your item data from Adaco is up-to-date; e.g. that your other integrations to Adaco are functioning correctly. |
| Insufficient Stock |
This error message is dependent on customer settings. If the customer chooses, they can either:
|
Example response with UnMatchedItems
[
   {
      "RequisitionNumber": 346,
      "RequisitionReference": "REQ002",
      "Status": "Created with Unmatched Items",
      "Errors": null,
      "UnMatchedItems": [
         "123: Unrecognised Item Type",
         "456: Unrecognised Item Number",
         "789: Insufficient Stock"
      ],
      "UnMatchedAccounts": []
   }
]
Unmatched Accounts results
The ToAccountNumber and FromAccountNumber enable you to add account information as desired. However, assigning accounts may become complicated; so to ensure that an error with assigning an account does not stop a requisition, Adaco will include the item in the requisition but:
- The item will be listed in the UnMatchedAccounts array.
- An Adaco user will need to manually assign an account to the line before the requisition can be posted.
The field UnMatchedAccounts will contain the item number (plus product detail number for products) and an error message describing what the issue is. For example:
"457: From Account invalid"
Example response with UnMatchedAccounts
[
   {
      "RequisitionNumber": 346,
      "RequisitionReference": "REQ002",
      "Status": "Created",
      "Errors": null,
      "UnMatchedItems": [],
      "UnMatchedAccounts": [
         "457: From Account invalid",
         "458: To Account invalid"
      ]
   }
]
Unsuccessful requests
As well as the above error messages for 200 requests, other types of unsuccessful requests receive an HTTP 400-599 response, with an error message in the response body. These match standard HTTP status codes.